Difference between revisions of "AgentSir"
| (5 intermediate revisions by the same user not shown) | |||
| Line 10: | Line 10: | ||
[[File:agentSir2.png|thumb|500px]] | [[File:agentSir2.png|thumb|500px]] | ||
The graph shows the number of infected and uninfected agents at the current point in time. | The graph shows the number of infected and uninfected agents at the current point in time. | ||
==Things To Try== | |||
===Change Slider Values=== | |||
:See how changing the infection and recovery probabilities, and the infection radius affects the sickness and wellness counts over time. | |||
===Alter The Matrix and Initial Agent Deployment=== | |||
:The layout of the walls and the position and status of the agents can be redefined by the user. | |||
====How to change the display==== | |||
In the following, '''Shortcut''' refers to either the Command key (Mac) or Control key (Windows) | |||
'''To change the position of walls''' | |||
#To toggle a single cell from blue to white or white to blue, press the '''Shortcut''' key and click on the cell. | |||
#To alter the colors of multiple cells press the '''Shortcut''' key and press on a cell with the desired color; then drag the mouse across the cells you want to change. | |||
'''To add or remove agents and change their status''' | |||
#'''To add an agent''': Press the Alt key (Option key on the Mac) and click on the cell where the agent is to be placed. Clicking a second time will change the agent from <span style="color:#009900">green</span> to <span style="color:#ff0000">red</span>. Clicking a third time will cause the agent to be deleted. Subsequent clicks will cycle through <span style="color:#009900">green</span>, <span style="color:#ff0000">red</span> and deleted agent. | |||
#'''To delete an agent''': Either click-through as in step 1 until the agent is deleted, or press Shift-Alt when clicking on the agent. | |||
#'''To add or delete multiple agents''': Add or delete as in the previous steps; then press down and drag over locations for new agents or drag over other agents for deletion. | |||
====Saving your configuration==== | |||
The display configuration is saved as part the workspace settings file and will reappear on startup. It can also be saved into a specific settings file and loaded as required. | |||
====Recovering the initial configuration==== | |||
Use '''File | Reset to Default Config''' to return to the original display. | |||
Latest revision as of 20:04, 24 February 2022
Download Ramp: AgentSir
Overview
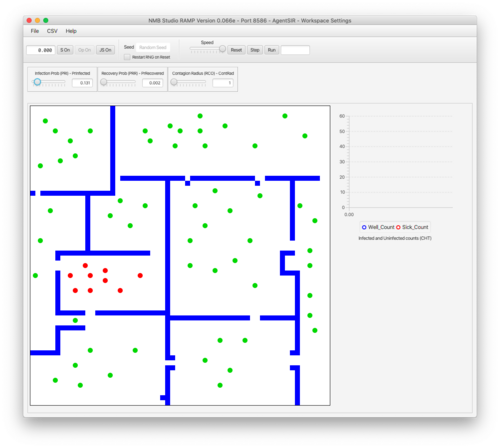
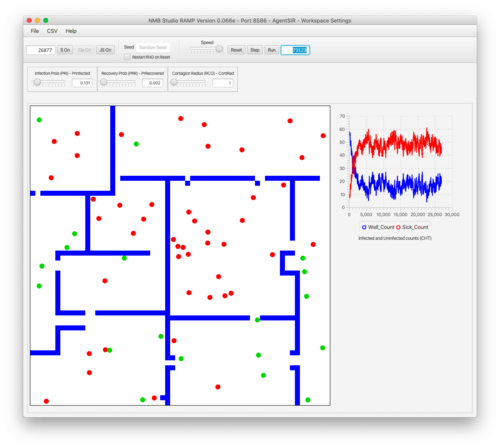
This agent-based Ramp simulates a simplified world of interaction among agents, some of whom are infected and can spread that infection. The world consists of a maze-like structure through which the agents wander in random directions like billiard balls, bouncing off of each other and the walls (their movement is most readily seen if you slow down the simulation using the speed control.)
When an uninfected agent is within the radius of infection of and infected agent (slider Contagion Radius), the uninfected agent may become infected. The probability of infection is controlled with slider Infection Prob. Similarly, at each point in time an infected agent may recover and become uninfected. This probability is controlled with slider Recovery Prob.
The graph shows the number of infected and uninfected agents at the current point in time.
Things To Try
Change Slider Values
- See how changing the infection and recovery probabilities, and the infection radius affects the sickness and wellness counts over time.
Alter The Matrix and Initial Agent Deployment
- The layout of the walls and the position and status of the agents can be redefined by the user.
How to change the display
In the following, Shortcut refers to either the Command key (Mac) or Control key (Windows)
To change the position of walls
- To toggle a single cell from blue to white or white to blue, press the Shortcut key and click on the cell.
- To alter the colors of multiple cells press the Shortcut key and press on a cell with the desired color; then drag the mouse across the cells you want to change.
To add or remove agents and change their status
- To add an agent: Press the Alt key (Option key on the Mac) and click on the cell where the agent is to be placed. Clicking a second time will change the agent from green to red. Clicking a third time will cause the agent to be deleted. Subsequent clicks will cycle through green, red and deleted agent.
- To delete an agent: Either click-through as in step 1 until the agent is deleted, or press Shift-Alt when clicking on the agent.
- To add or delete multiple agents: Add or delete as in the previous steps; then press down and drag over locations for new agents or drag over other agents for deletion.
Saving your configuration
The display configuration is saved as part the workspace settings file and will reappear on startup. It can also be saved into a specific settings file and loaded as required.
Recovering the initial configuration
Use File | Reset to Default Config to return to the original display.

