Difference between revisions of "Frames, Menus, Toolbars"
(→Menus) |
|||
| (53 intermediate revisions by the same user not shown) | |||
| Line 1: | Line 1: | ||
In this section we | In this section we provide an overview of each element of the Numerus interface. The section contains links to more detailed descriptions. | ||
==Frames== | ==Frames== | ||
| Line 5: | Line 5: | ||
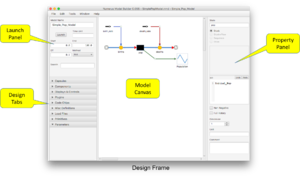
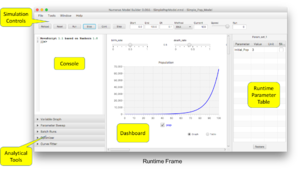
Nova has two frames, the '''Design Frame''' and the '''Runtime Frame'''. As these names suggest, the Design Frame provides tools for creating and building a Numerus model. Once this model is built, the Runtime Frame provides the means to control and view the running simulation, in addition to special analytical tools of particular use with numerical models. | Nova has two frames, the '''Design Frame''' and the '''Runtime Frame'''. As these names suggest, the Design Frame provides tools for creating and building a Numerus model. Once this model is built, the Runtime Frame provides the means to control and view the running simulation, in addition to special analytical tools of particular use with numerical models. | ||
Links are provided to detailed descriptions | |||
<span id="designframe"> | |||
===Design Frame=== | ===Design Frame=== | ||
[[File: | [[File:mainframe1.png|thumb]] | ||
;a. Launch Panel: Sets the simulation parameters and launches the model for execution; | ;a. [[Launch Panel]]: Sets the simulation parameters and launches the model for execution; | ||
;b. Design Tabs: | ;b. [[#Design Tabs|Design Tabs]]: An accordion list<ref name="accordion">An ''accordion list'' is s graphical control element comprising a vertically stacked list of items, such as labels or thumbnails. Each item can be "expanded" or "stretched" to reveal the content associated with that item. There can be zero expanded items, exactly one, or more than one item expanded at a time, depending on the configuration.</ref> of tools for building models; each of these is discussed in detail elsewhere; | ||
;c. Model Canvas: Construction platform for component-based models; | ;c. Model Canvas: Construction platform for component-based models; | ||
;e. Property Pane: Shows controls for specifying component properties; | ;e. Property Pane: Shows controls for specifying component properties; | ||
</span> | |||
===Runtime Frame=== | ===Runtime Frame=== | ||
[[File:RuntimeFrame.png|thumb]] | [[File:RuntimeFrame.png|thumb]] | ||
;a. Simulation | ;a. [[#Simulation Toolbar|Simulation Toolbar]]: Buttons for running the simulation, viewing current time, and setting temporary simulation parameters; | ||
;b. Console: provides Interactive access to the Numerus runtime interpreter. | ;b. Console: provides Interactive access to the Numerus runtime interpreter. | ||
;c. Analytical Tools: Available when parameters are used for parameter sweep, optimization, etc. | ;c. Analytical Tools: Available when parameters are used for parameter sweep, optimization, etc. | ||
;d. Dashboard: Contains controls and visualizing elements for use during simulation execution. | ;d. Dashboard: Contains controls and visualizing elements for use during simulation execution. | ||
;e. Runtime Parameter Table: Facilitates temporary parameter settings | ;e. Runtime Parameter Table: Facilitates temporary parameter settings | ||
<br clear=all> | |||
[[File:framesliders.png|thumb]] | |||
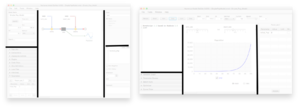
The sections of these frames are separated by dividers (shown in black in the picture on the right) that can be shifted to expose more or less of one side or the other. | |||
Use these dividers as needed to create additional viewing space when using one of the panels. | |||
<br clear=all> | <br clear=all> | ||
==Menus== | ==Menus== | ||
===Design Frame=== | |||
{| class="wikitable" | {| class="wikitable" | ||
|File||New||Clears the system and creates a new project | |File||New||Clears the system and creates a new project | ||
| Line 58: | Line 65: | ||
|- | |- | ||
|||Delete||Remove the currently selected components without copying | |||Delete||Remove the currently selected components without copying | ||
|- | |||
|||Select All||Selects all components in the current capsule | |||
|- | |- | ||
|||Create Phantoms||Adds phantom components corresponding to those currently selected | |||Create Phantoms||Adds phantom components corresponding to those currently selected | ||
| Line 77: | Line 86: | ||
|||Snap to Grid||Realigns all components with the underlying model canvas grid. | |||Snap to Grid||Realigns all components with the underlying model canvas grid. | ||
|- | |- | ||
|||Reset | |||Reset Zoom||Returns design canvas zoom level to 0. | ||
|- | |- | ||
|||Documentation||Opens the documentation panel. | |||Documentation||Opens the documentation panel. | ||
|- | |||
|||Add Connector||Initiates selection process for adding a dependency connector | |||
|- | |||
|||Delete Connector||Initiates selection process for deleting a dependency connector | |||
|- | |||
|||Reset Connectors||Re-evaluates connector state of the current capsule | |||
|- | |- | ||
|||Arrows On||In this mode all arrows are visible. | |||Arrows On||In this mode all arrows are visible. | ||
| Line 87: | Line 102: | ||
|||Arrows Off||In this mode no arrows are visible. | |||Arrows Off||In this mode no arrows are visible. | ||
|- | |- | ||
|||Connector Beads Visible||Exposes connector beads | |||Connector Beads Visible/Invisible||Exposes/Hides connector beads | ||
|- | |- | ||
||| | |||Build Website||Creates Website for current project (Full version only) | ||
|- | |- | ||
||| | |Window||Displays all windows associated with current project|| | ||
|- | |||
|Help|||About||Shows version number, etc. | |||
|} | |||
===Runtime Frame=== | |||
{| class="wikitable" | |||
|File||Save Output||Saves graph/table data to CSV file and/or image of graph/table to PNG file | |||
|- | |||
|||Close||Closes runtime frame | |||
|- | |||
|Tools||Reset Zoom||Resets dashboard zoom level | |||
|- | |- | ||
| | |||View Novascript||Displays the Novascript implementation of the current project | ||
|- | |- | ||
||| | |Window||Displays all windows associated with current project|| | ||
|- | |- | ||
|Help||| | |Help|||About||Shows version number, etc. | ||
|} | |} | ||
== | ==Design Tabs== | ||
= | This accordion list<ref name=accordion/> contains all of the tools needed to design models. Each item links to a page providing details. | ||
: The | ;[[Capsules|Capsule List]]: The list of capsules used in the project, with controls to add and delete capsules, and the ability for reordering the list. | ||
[[ | ;[[Components, Displays and Controls, Plugins|Components]]: The list of model components. These can be inserted into the model by dragging them onto the model canvas. | ||
;[[Components, Displays and Controls, Plugins|Displays & Controls]]: A similar list of display and control components. | |||
: The | ;[[Components, Displays and Controls, Plugins|Plugins]]: A similar list of plugins<ref>A ''plugin'' is a special component that can be included with a particular configuration of the software.</ref>. | ||
[[ | ;[[Code Chips|Code Chips]]: The list of code chips used in this model, with controls to add and delete code chips. | ||
;[[Misc Definitions|Misc Definitions]]: Reveals a second accordion list with tabs for Prelude, Global Functions, Global Variables/Constants and Local Methods. | |||
;[[Load Files|Load Files]]: Reveals a second accordion with tabs for specifying JavaScript, TSV and CSV files to be loaded by the simulation. | |||
;[[Primitives]]: Reveals two lists (primitive operators and primitive properties). Right-clicking on any element of these lists will result in a pop-up window with a definition of the element. | |||
;[[Parameters]]: The list of parameter sets and parameters. Parameter sets can be created and parameters can be added or deleted. | |||
[[ | |||
[[ | |||
== | ==Simulation Toolbar== | ||
* ''' | ===Buttons=== | ||
* ''' | *'''Reload''': Rereads and reinitializes the simulation. | ||
* ''' | *'''Reset''': Resets the simulation to its initial state without reloading. | ||
*'''Run''': Executes the simulation. | |||
*'''Stop''': Halts the simulation in its current state. | |||
*'''Continue''': Restarts the simulation, either from initial state or following a Stop. | |||
*'''Step''': Executes a single step (elapsed time = 1 Dt). | |||
==Runtime Parameter Controls== | |||
Most can be edited for a given run. Their values are not saved. | |||
*'''Start''': Model time at the start of the simulation. | |||
*'''End''': Model time at the end of the simulation. | |||
*'''Dt''': Time step (elapsed time for each simulation step). | |||
*'''[[Simulation Concepts|Method]]''': Integration method. | |||
*'''Current''': Displays current model time (cannot be edited). | |||
*'''Speed''': Controls execution speed. | |||
*'''Run''': Displays number of executions since last reload (cannot be edited). | |||
==Notes== | |||
<references/> | |||
Latest revision as of 19:49, 12 March 2018
In this section we provide an overview of each element of the Numerus interface. The section contains links to more detailed descriptions.
Frames
Nova has two frames, the Design Frame and the Runtime Frame. As these names suggest, the Design Frame provides tools for creating and building a Numerus model. Once this model is built, the Runtime Frame provides the means to control and view the running simulation, in addition to special analytical tools of particular use with numerical models.
Links are provided to detailed descriptions
Design Frame
- a. Launch Panel
- Sets the simulation parameters and launches the model for execution;
- b. Design Tabs
- An accordion list[1] of tools for building models; each of these is discussed in detail elsewhere;
- c. Model Canvas
- Construction platform for component-based models;
- e. Property Pane
- Shows controls for specifying component properties;
Runtime Frame
- a. Simulation Toolbar
- Buttons for running the simulation, viewing current time, and setting temporary simulation parameters;
- b. Console
- provides Interactive access to the Numerus runtime interpreter.
- c. Analytical Tools
- Available when parameters are used for parameter sweep, optimization, etc.
- d. Dashboard
- Contains controls and visualizing elements for use during simulation execution.
- e. Runtime Parameter Table
- Facilitates temporary parameter settings
The sections of these frames are separated by dividers (shown in black in the picture on the right) that can be shifted to expose more or less of one side or the other.
Use these dividers as needed to create additional viewing space when using one of the panels.
Menus
Design Frame
| File | New | Clears the system and creates a new project |
| Open | Select and load project | |
| Recent Files | Shows recently opened project for selection | |
| Reload | Rereads the current project into Nova | |
| Browse Model Library | Opens a browsing window to allow selection of a project from the model library | |
| New Project Window | Opens a new empty design frame | |
| Save | Saves the current project | |
| Save As | Saves the current project, possibly in a new file | |
| Import Capsule(s) Into Project | Imports a selected project as a submodel | |
| Export Current Capsule | Exports currently viewed capsule (and any dependencies) for import into another project | |
| Open Current Capsule as New Project | Opens a new design frame with currently viewed capsule, as main level, and any dependencies | |
| Preferences | Opens User Preference dialog | |
| Exit | Exits program | |
| Edit | Cut | Remove the currently selected components and copy to the clipboard |
| Copy | Copy the currently selected components to the clipboard | |
| Paste | Paste contents of the clipboard to the model canvas | |
| Delete | Remove the currently selected components without copying | |
| Select All | Selects all components in the current capsule | |
| Create Phantoms | Adds phantom components corresponding to those currently selected | |
| Duplicate Current Capsule(s) | Copies and pastes currently selected capsules into the current project | |
| Copy Current Capsule(s) | Copies currently selected capsules | |
| Paste Capsules(s) | Pastes previously copied capsules into current project | |
| Tools | Load Parameters | Select and load a parameter set |
| Edit Equations | Opens the Component Equation Panel, which permits editing of all component equations on the current level | |
| Capsule Program | Displays a compact description of the model's equations | |
| View Novascript | Displays the Novascript implementation of the current project | |
| Snap to Grid | Realigns all components with the underlying model canvas grid. | |
| Reset Zoom | Returns design canvas zoom level to 0. | |
| Documentation | Opens the documentation panel. | |
| Add Connector | Initiates selection process for adding a dependency connector | |
| Delete Connector | Initiates selection process for deleting a dependency connector | |
| Reset Connectors | Re-evaluates connector state of the current capsule | |
| Arrows On | In this mode all arrows are visible. | |
| Arrows Highlight | In this mode only those arrows for the component under the mouse are visible. | |
| Arrows Off | In this mode no arrows are visible. | |
| Connector Beads Visible/Invisible | Exposes/Hides connector beads | |
| Build Website | Creates Website for current project (Full version only) | |
| Window | Displays all windows associated with current project | |
| Help | About | Shows version number, etc. |
Runtime Frame
| File | Save Output | Saves graph/table data to CSV file and/or image of graph/table to PNG file |
| Close | Closes runtime frame | |
| Tools | Reset Zoom | Resets dashboard zoom level |
| View Novascript | Displays the Novascript implementation of the current project | |
| Window | Displays all windows associated with current project | |
| Help | About | Shows version number, etc. |
Design Tabs
This accordion list[1] contains all of the tools needed to design models. Each item links to a page providing details.
- Capsule List
- The list of capsules used in the project, with controls to add and delete capsules, and the ability for reordering the list.
- Components
- The list of model components. These can be inserted into the model by dragging them onto the model canvas.
- Displays & Controls
- A similar list of display and control components.
- Plugins
- A similar list of plugins[2].
- Code Chips
- The list of code chips used in this model, with controls to add and delete code chips.
- Misc Definitions
- Reveals a second accordion list with tabs for Prelude, Global Functions, Global Variables/Constants and Local Methods.
- Load Files
- Reveals a second accordion with tabs for specifying JavaScript, TSV and CSV files to be loaded by the simulation.
- Primitives
- Reveals two lists (primitive operators and primitive properties). Right-clicking on any element of these lists will result in a pop-up window with a definition of the element.
- Parameters
- The list of parameter sets and parameters. Parameter sets can be created and parameters can be added or deleted.
Simulation Toolbar
Buttons
- Reload: Rereads and reinitializes the simulation.
- Reset: Resets the simulation to its initial state without reloading.
- Run: Executes the simulation.
- Stop: Halts the simulation in its current state.
- Continue: Restarts the simulation, either from initial state or following a Stop.
- Step: Executes a single step (elapsed time = 1 Dt).
Runtime Parameter Controls
Most can be edited for a given run. Their values are not saved.
- Start: Model time at the start of the simulation.
- End: Model time at the end of the simulation.
- Dt: Time step (elapsed time for each simulation step).
- Method: Integration method.
- Current: Displays current model time (cannot be edited).
- Speed: Controls execution speed.
- Run: Displays number of executions since last reload (cannot be edited).
Notes
- ↑ 1.0 1.1 An accordion list is s graphical control element comprising a vertically stacked list of items, such as labels or thumbnails. Each item can be "expanded" or "stretched" to reveal the content associated with that item. There can be zero expanded items, exactly one, or more than one item expanded at a time, depending on the configuration.
- ↑ A plugin is a special component that can be included with a particular configuration of the software.


